lunedì 6 ottobre 2014

Ogni riga si terminerà con un punto bassissimo, tagliando il filo e sfilandolo. schema uncinetto
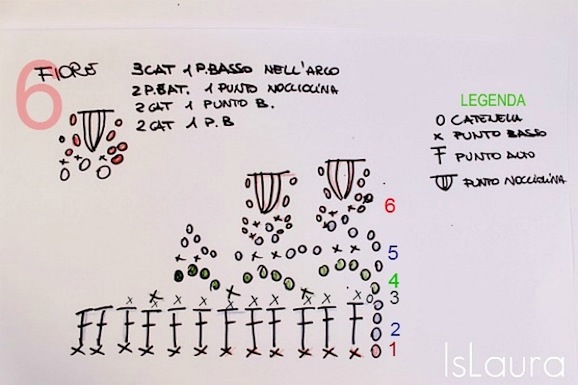
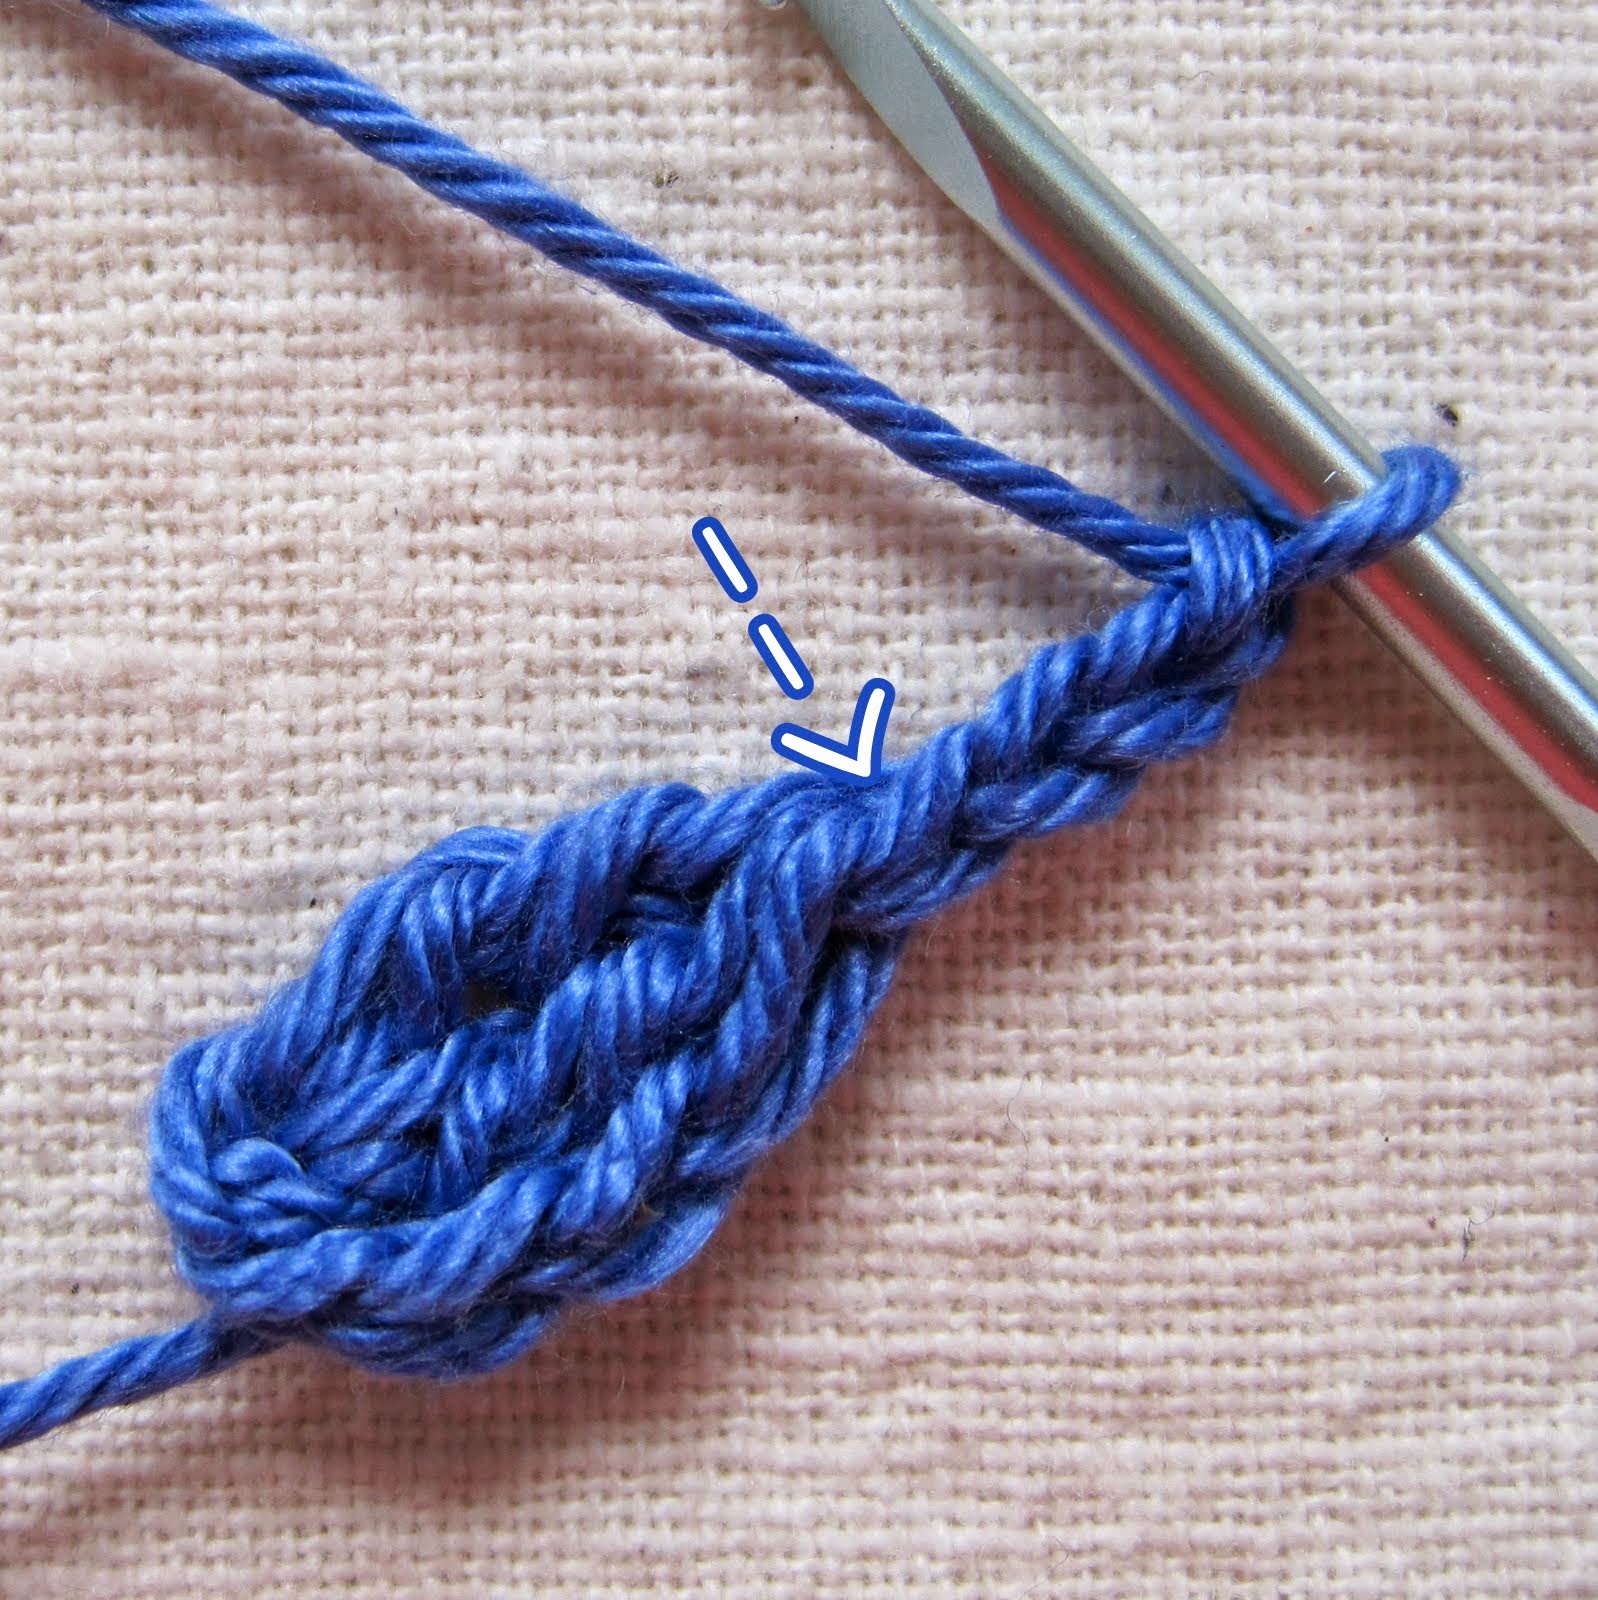
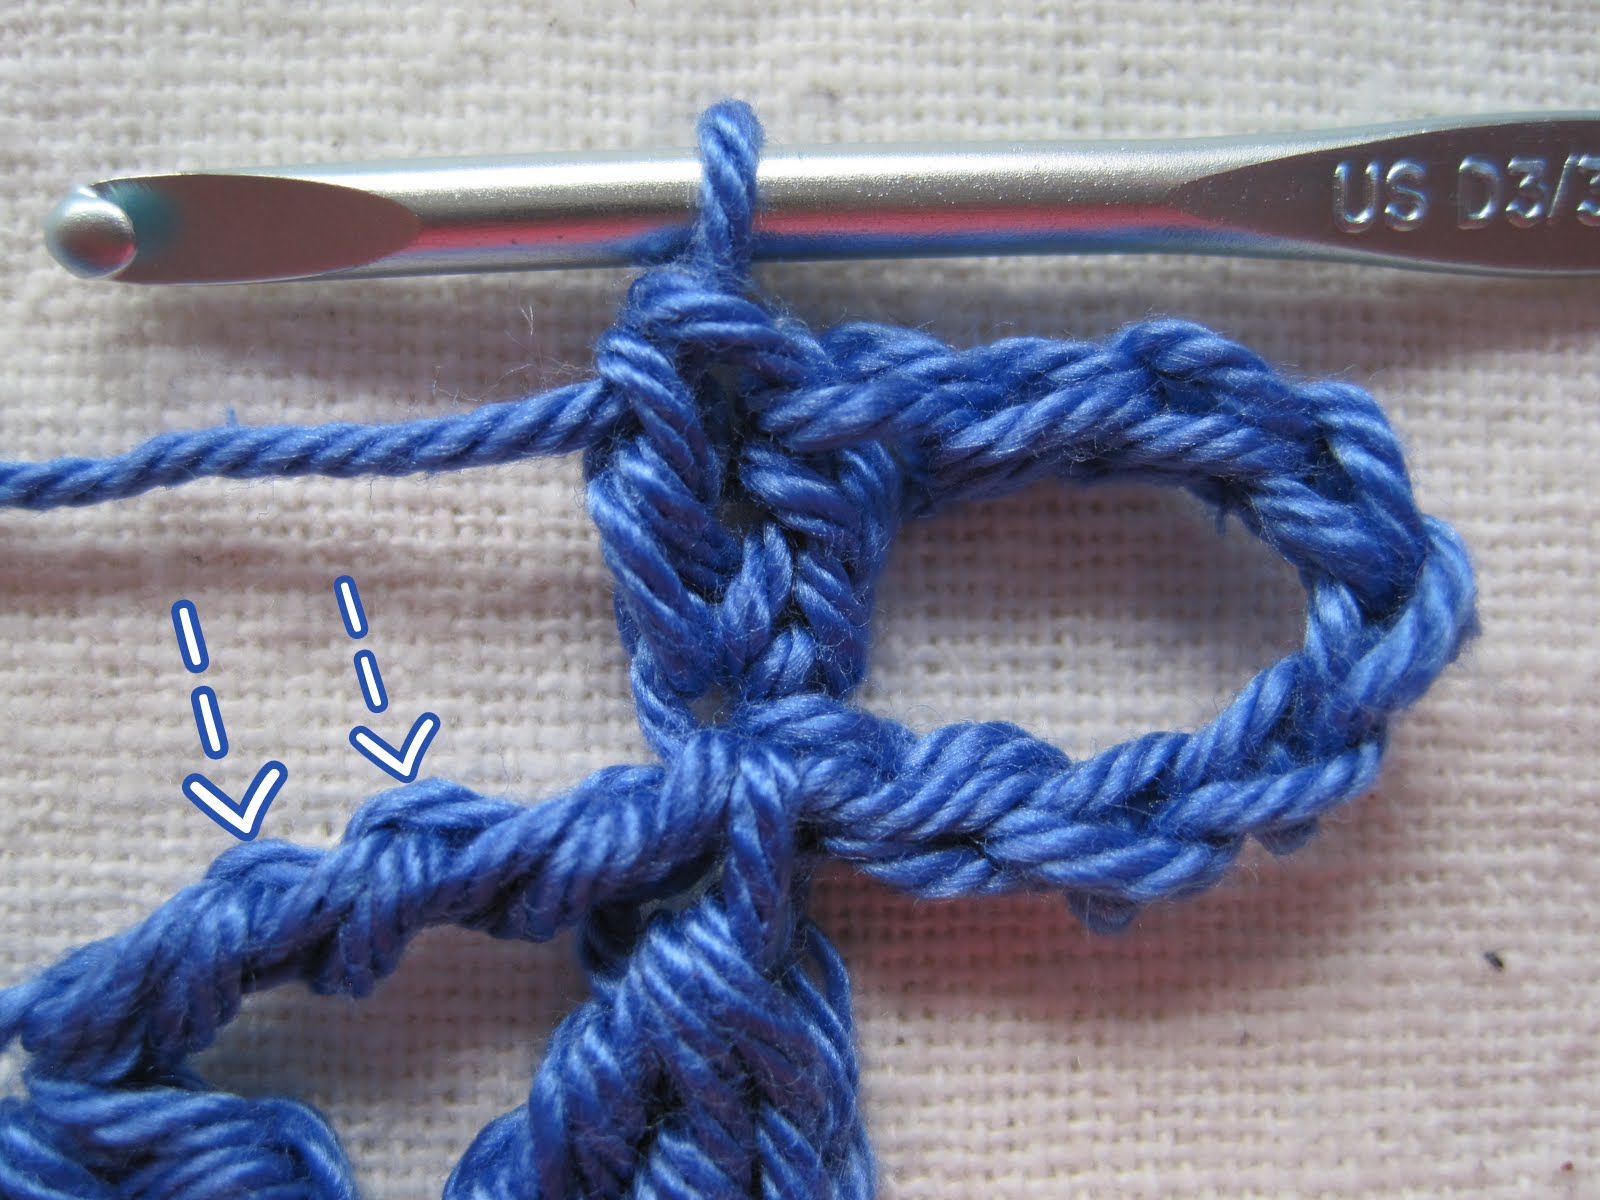
I punti sono quelli base: catenella, punto basso, il bassissimo e punto alto a parte i fiorellini finali che verranno eseguiti con colori diversi e alternati. Il punto centrale contrassegnato da 4 aste con una barra in alto è il punto nocciolina o punto stitch, filo sull’uncinetto, infilare l’uncinetto nel punto di base, un’altra volta filo sull’uncinetto, questo per 4 volte e chiudere poi tutti i punti insieme.
Riga 1: 1 cat. una serie di punti bassi lavorati sulla coda di topo. Il numero è variabile a seconda della lunghezza desiderata, l’importante che siano multipli di 4.
Riga 2: 3 cat. e continuare con una serie di punti alti.
Riga 3: 1 cat. e una serie di punti bassi.
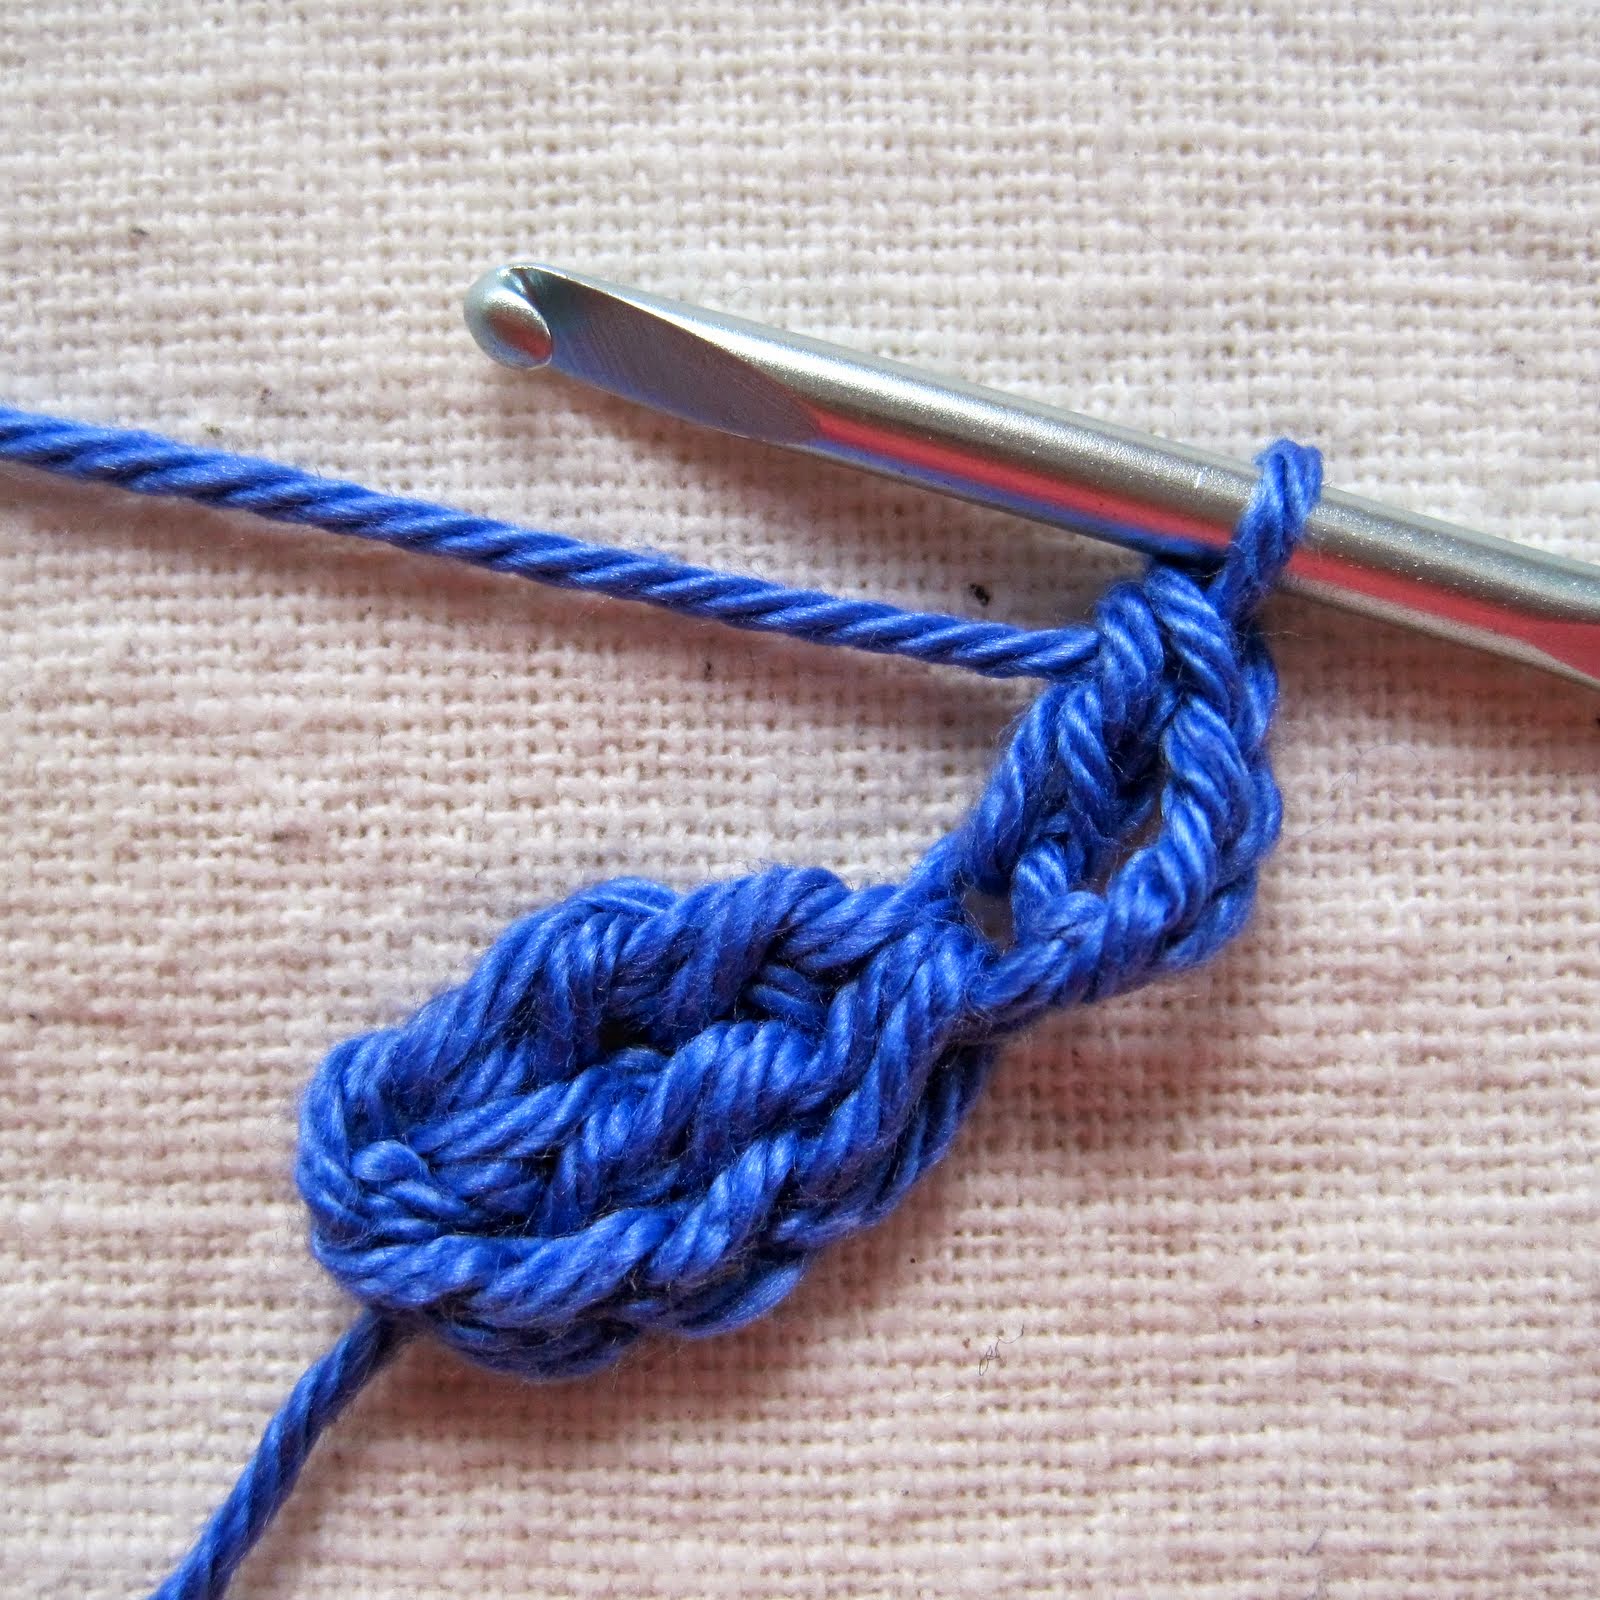
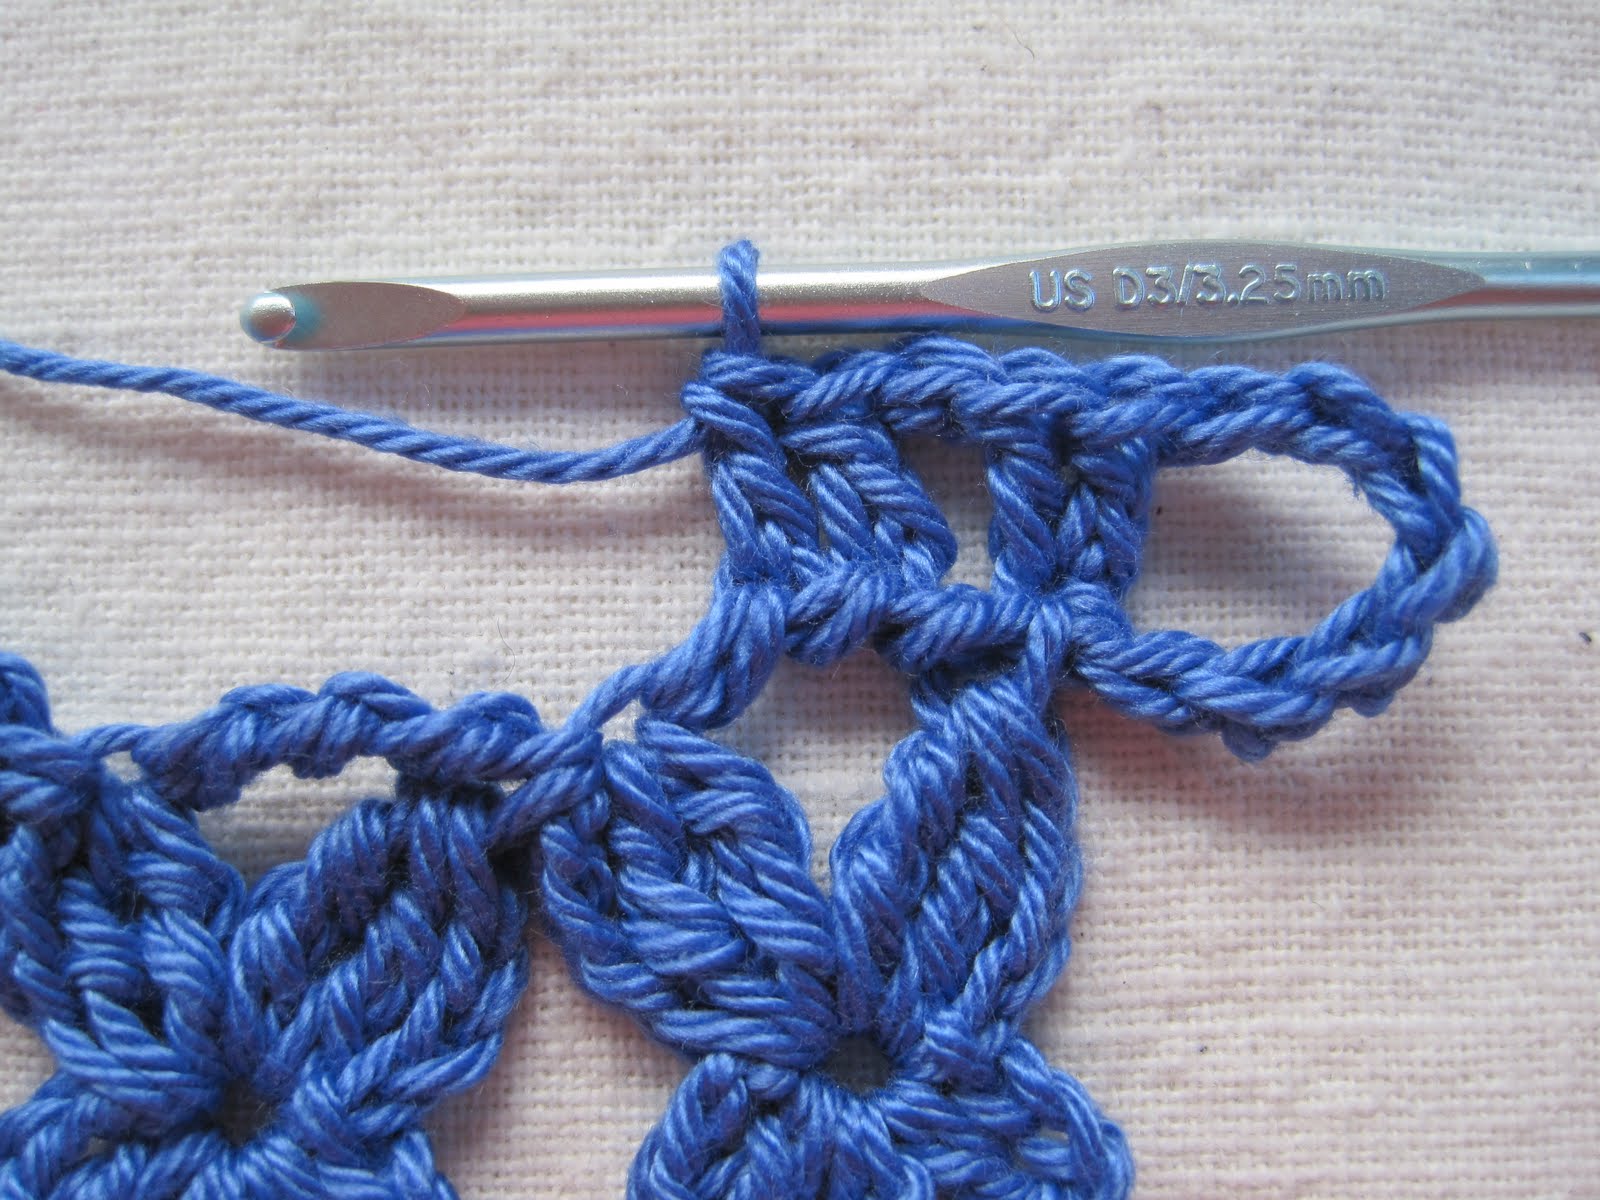
Riga 4: 5 cat. 1 punto basso saltando 2 punti bassi della riga sottostante, continuare con 4 cat. e 1 punto basso sempre saltando 2 punti bassi. Proseguire sino al termine della riga.
Riga 5: 3 cat. nell ‘archetto sottostante lavorare: *1 p.basso, 3 cat., 1 p.basso, 3 cat. sino ad arrivare all’altro archetto*, ripetere da *a* sino al termine.
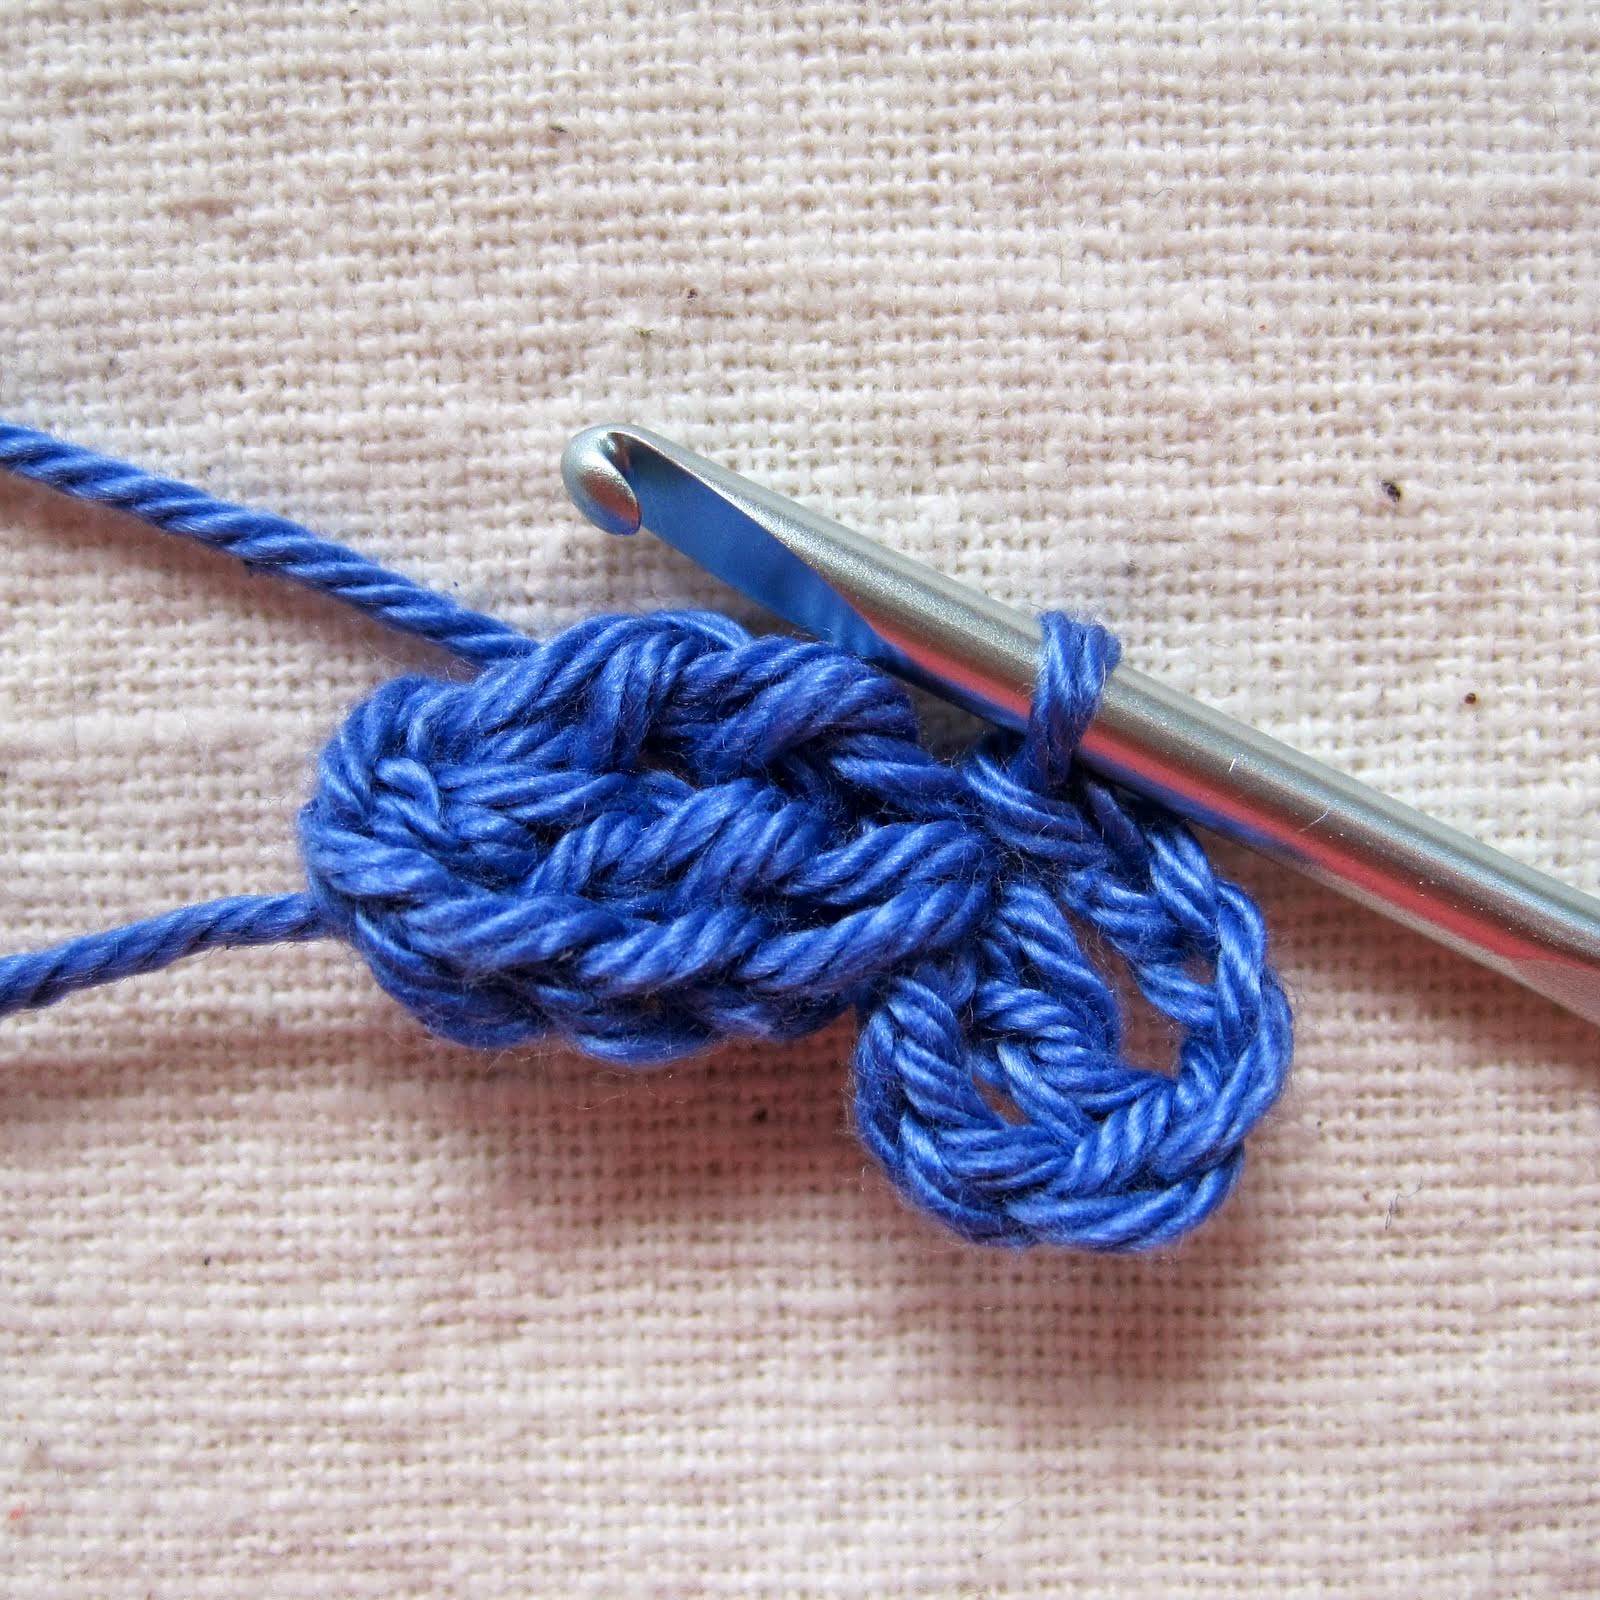
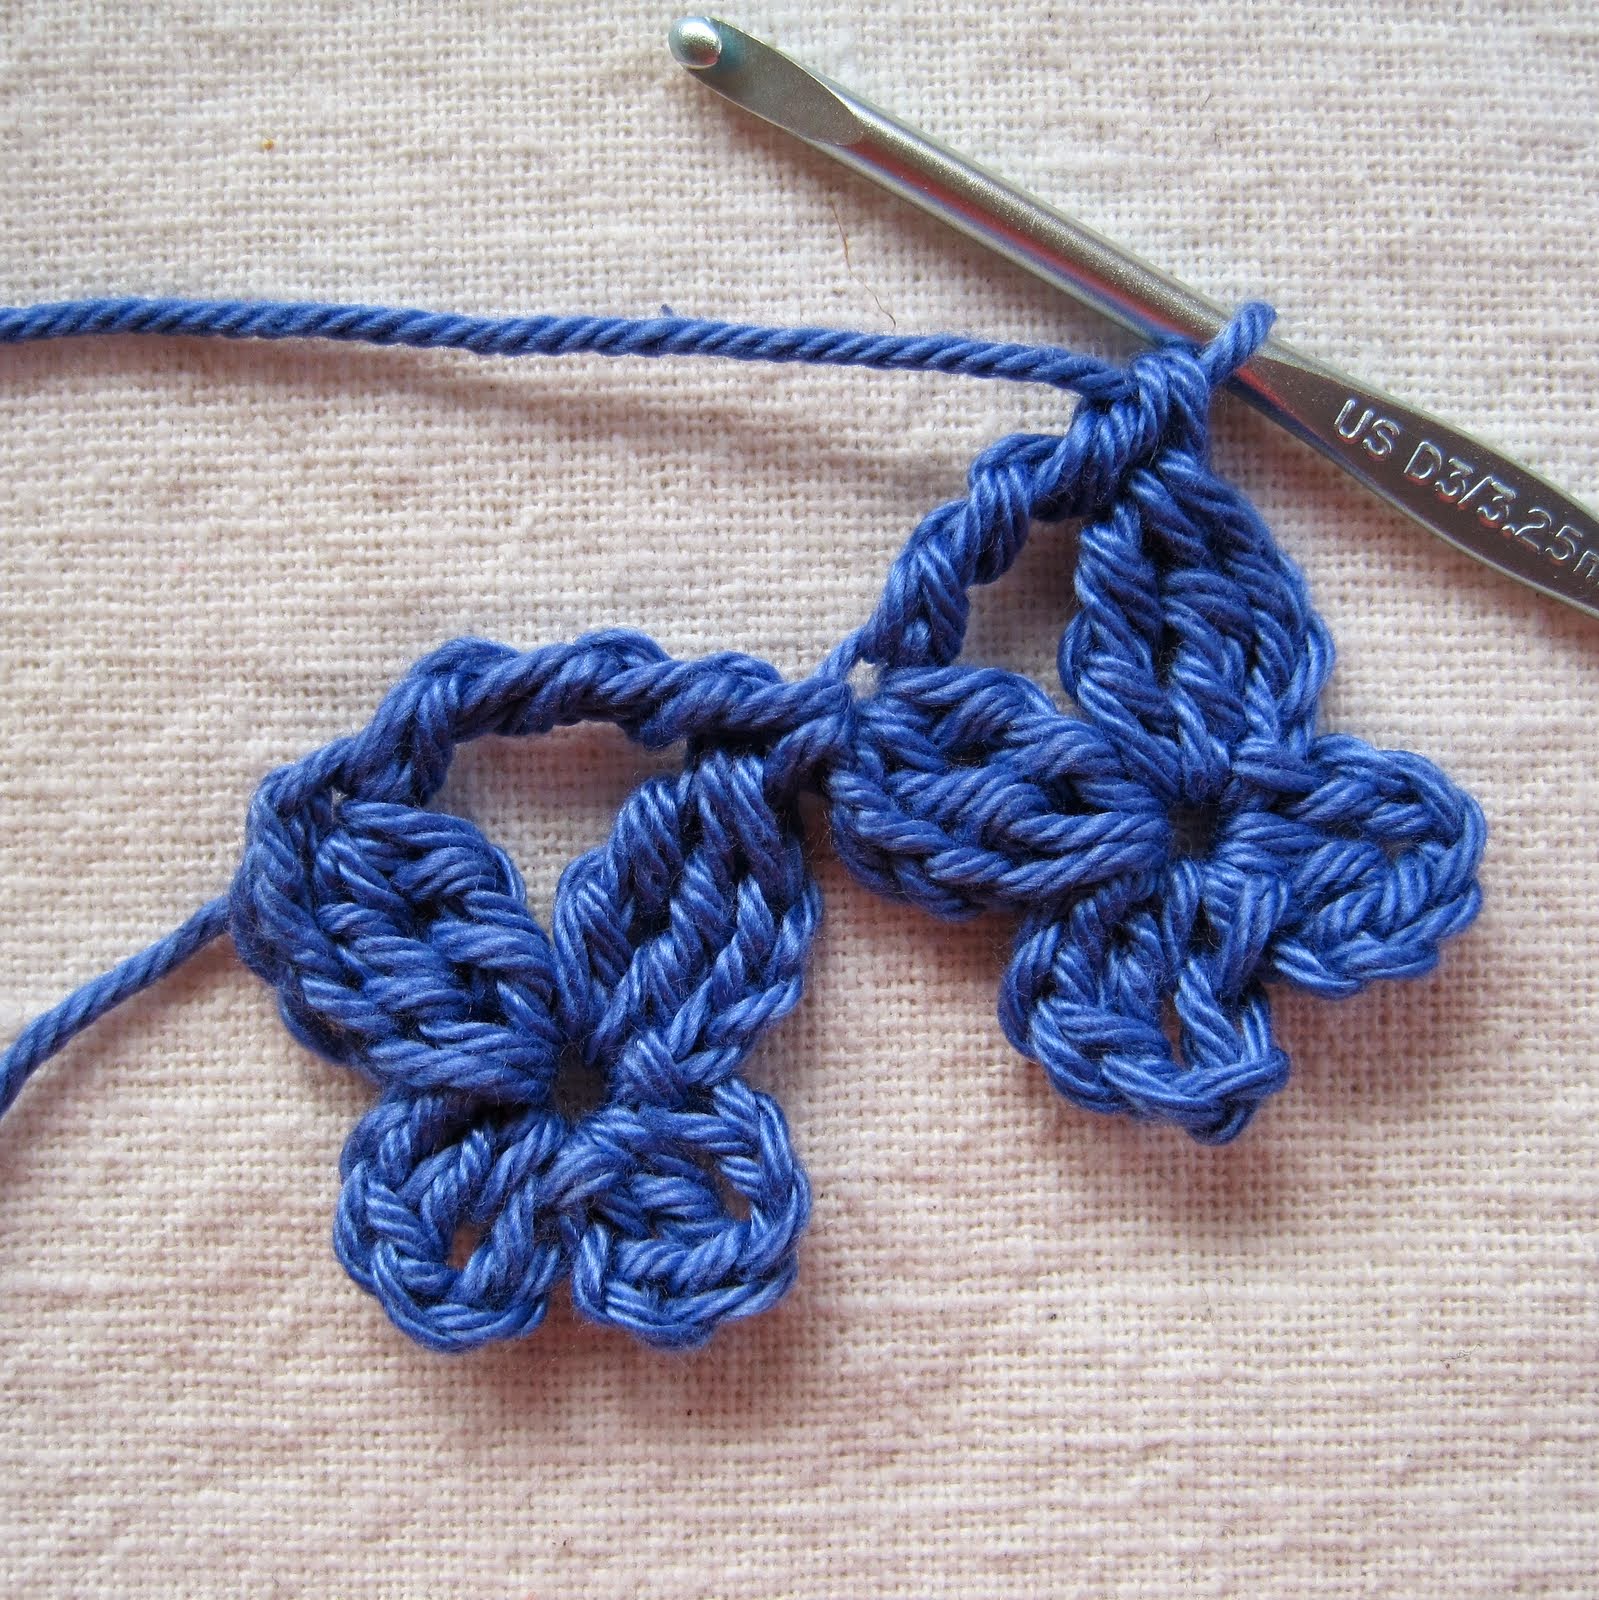
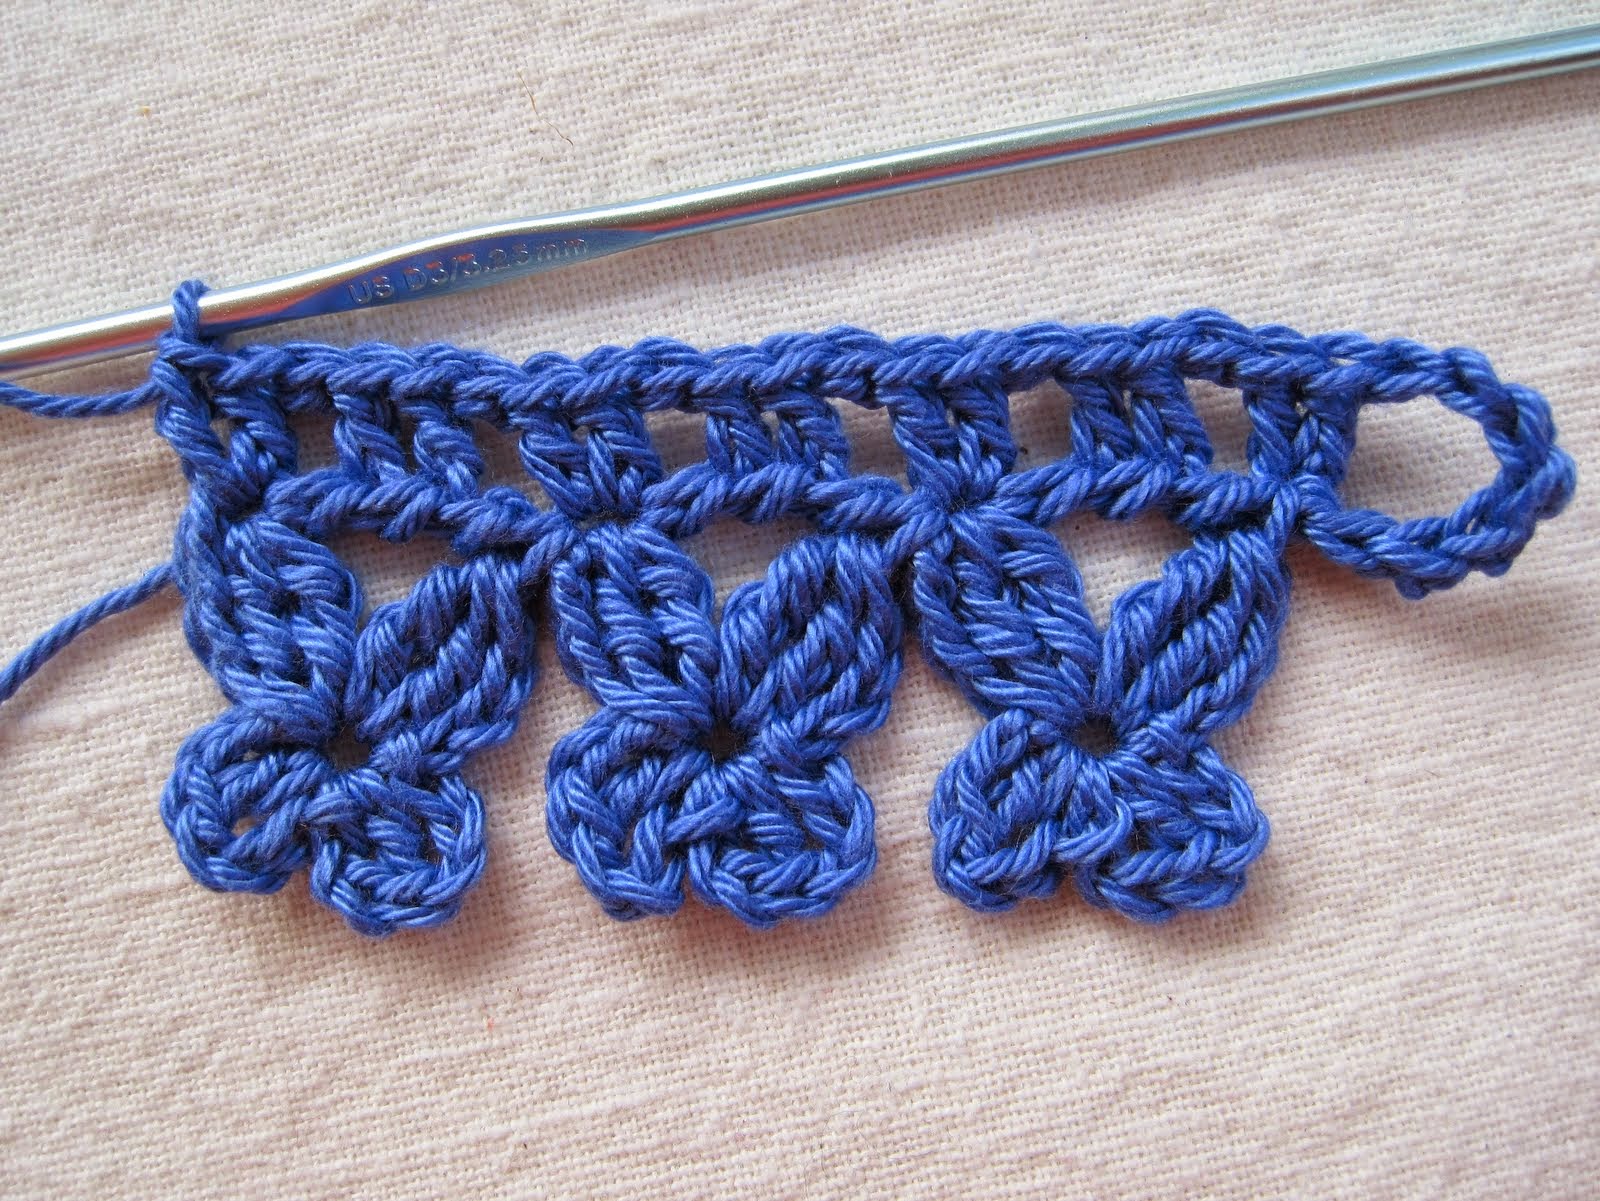
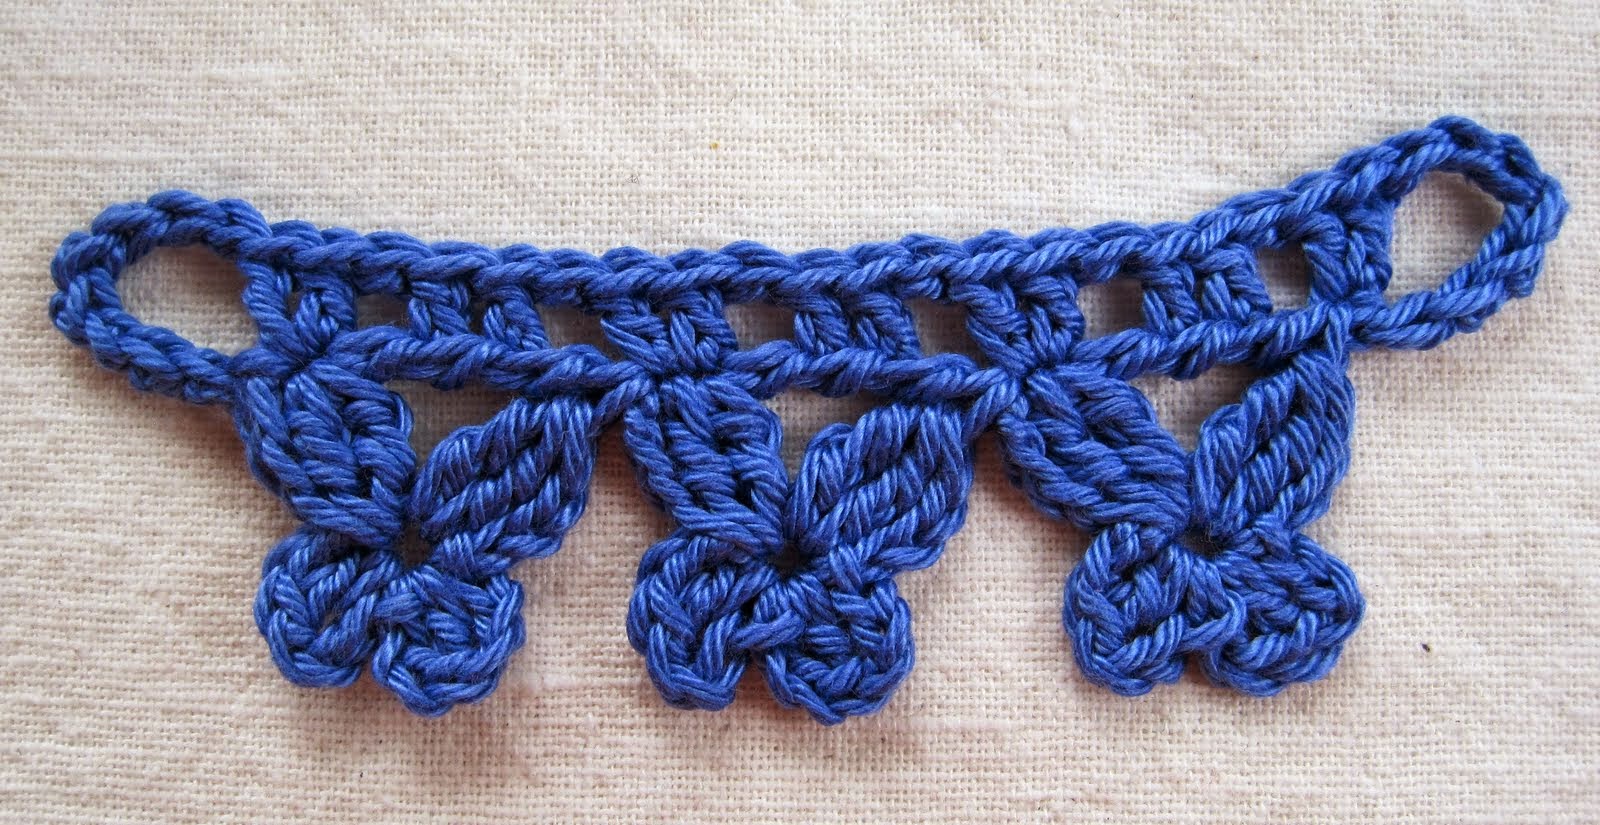
Riga 6: su ogni archetto della riga 5 creare i fiori in colori differenti. 3 cat. 1 punto basso, 2 cat. 1 punto nocciolina, 2 cat. 1 punto basso, 2 cat, 1 punto basso. Chiudere con un punto bassissimo, tagliare e sfilare il filo. Ripetere ogni fiore su ogni archetto della riga precedente.
tutorial collier
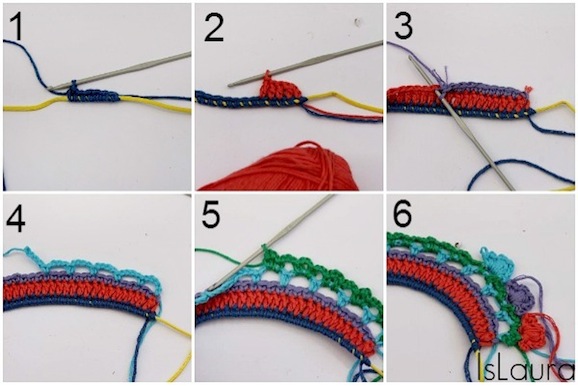
Qui sopra potete vedere i vari passaggi fotografati.
Quando si è giunti al termine fissare, con l’aiuto dell’ago, tutti i fili.
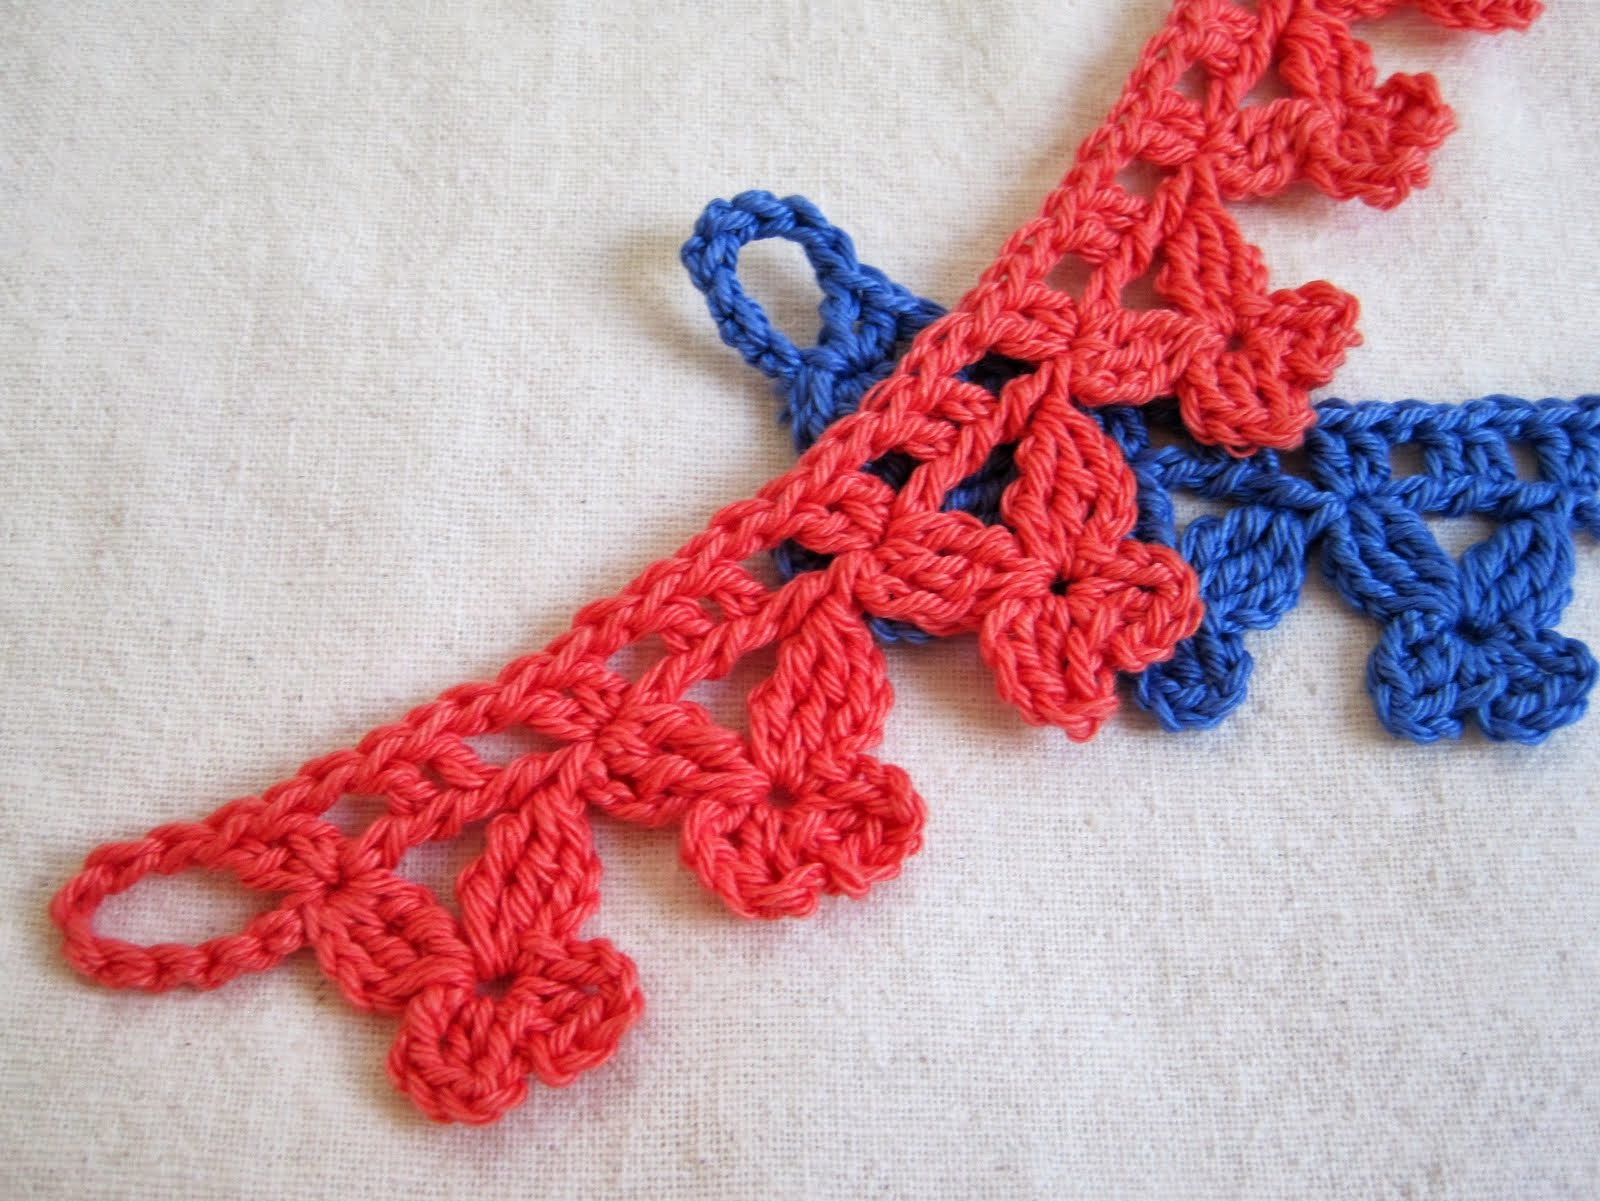
Ho voluto aggiungere al centro dei fiorellini tanti fili passati attraverso il foro e fermati tra loro
collier tutorial Occorre veramente pochissimo tempo, ma la soddisfazione è

royal collana crochet

  1. fettuccia di cotone, può essere anche ricavata da vecchie magliette tagliate  seguendo questo tutorial.
  2. uncinetto n°8.
  3. forbici
Difficoltà: facile.
Tempo d’ esecuzione: 15 minuti
Punti impiegati: catenella, punto basso, punto bassissimo,punto mezzo alto, punto alto.
Troverete di seguito la legenda punti e sotto lo schema.
legenda punti
schema punti
Lo schema è ruotato per semplificare la lettura.
Si lavorerà a righe, le righe 1,2,3 saranno lavorate di seguito, senza interruzioni, la 4 e la 5 inizieranno e finiranno inpunti diversi.
Si partirà da “START”e ogni partenza sarà contrassegnata con la lettera “P” e ogni  arrivo con “A”.
Riga 1: eseguire 23 catenelle.
Riga 2: eseguire 1 catenella e lavorare 1 punto basso in ogni catenella della riga sottostante.
Riga 3: si potrà proseguire come nello schema,(cioè non tagliare il filo,girare il lavoro e andare avanti) io invece ho preferito partire a sinistra (chiudendo e tagliando il filo precedentemente) partendo con 3 catenelle, 1 p.b. saltando 1 p.b. sottostante, 5 catenelle,  1 p.b. saltando su 1 p.b. sottostante, 1 mezza maglia alta, 1 catenella, 1 maglia alta saltando 1 punto di base,1 catenella,1 maglia alta saltando 1 punto di base, 1 catenella, 1 maglia alta saltando 1 punto di base 1 catenella 1 maglia alta nello stesso punto, 1 catenella,1 maglia alta saltando 1 punto di base, 1 catenella, 1 maglia alta saltando 1 punto di base, 1 catenella, 1 mezza maglia alta saltando 1 punto di base, 1 p.b. saltando 1 p.b. sottostante, 5 catenelle, 1 p.b. saltando su di 1 p.b. sottostante,  3 catenelle, 1 p.b. saltando 1 p.b. sottostante, chiudere la riga con 1 punto bassissimo, tagliare e sfilare.
Riga 4: sul mezzo punto alto della riga 3, lavorare 5 catenelle, 1 p.b. saltando 1 p.alto sottostante, 5 catenelle, 1 punto alto sul punto alto sottostante, 1 p.alto, 1 catenella sul punto alto centrale,  1 punto alto sul punto alto sottostante, 1 p.alto, 1 catenella sul punto alto centrale, 1 punto alto sul punto alto sottostante,  5 catenelle, 1 p.b. saltando sul 1 p.alto sottostante, , lavorare 5 catenelle, 1 punto bassissimo sul punto mezzo alto, tagliare e sfilare.
Riga 5: 6 catenelle sul primo punto alto, 1 punto alto tra i gruppi di doppi punti alti del giro sottostante, 5 catenelle (pippiolino) 1 punto bassissimo, 6 catenelle sul punto alto, 1 punto bassissimo, tagliare e sfilare.
Ho voluto fare un punto in rilievo davanti, 1 punto catenella tra la prima e la seconda riga. Lasciare all’inizio e alla fine 2 lunghi capi, una volta terminata la rifinitura, fare 1 nodo all’inizio e alla fine (bordo collana ) e questi serviranno da chiusura. In alternativa comprate una catenina dorata con chiusura.

collana crochet royal


 http://islaura.it/royal-necklace-a-crochet/

domenica 5 ottobre 2014


roselline-uncinetto
I materiali che dovrete utilizzare sono: cotone in due colori a vostra scelta, uncinetto n. 1,9 e una base per la spilla.
Il primo passo per ottenere una perfetta rosa all’uncinetto sarà avviare 40 catenelle e poi, dopo aver lavorato 2 maglie alte nella prima catenella, dovrete saltare la catenella successiva. Ripetere il procedimento.
Tra le due maglie alte, lavorate * 2 maglie alte, 3 catenelle, 2 maglie alte, 1 catenella e *ripetete da * a *. A questo punto del lavoro, vedrete che la vostra creazione inizierà ad arricciarsi naturalmente.
Nell’archetto formato dalle 3 catenelle lavorate * 11 maglie alte, 1 maglia bassa sulla catenella sottostante *. Ripetere da * a *. Fatto questo, potete cambiate colore e usare dell filo bianco, realizzando un piccolo nodo. Poi fate un giro a maglia bassa, tagliate il filo e iniziate ad arrotolare la rosa su se stessa.
 schema


 schema


Come vedete il disegno non è la fine del mondo, lo schema lascia abbastanza a desiderare, ora cercherò di spiegare il fiore azzurro con una descrizione dei punti.
Descrizione del fiore azzurro.
Con l’uncinetto numero 2,5 e il filo giallo, eseguire 8 catenelle, chiudere il cerchio con una maglia bassissima.
1°giro: lavorare nel cerchio 14 maglie basse, 1 maglia bassissima per chiudere il giro.
2°giro: con il filo azzurro puntare l’uncinetto solo nel filo DAVANTI della maglia, lavorare 1 maglia bassa e un petalo. Il petalo si esegue nel seguente modo: 7 catenelle,1 maglia bassa nella 3 catenella , terminare con una maglia bassa nel filo DAVANTI usato in principio.
Continuare il giro lavorando in tutto 14 petali, chiudere con una maglia bassissima.
3°giro: lavorare il filo DIETRO al petalo, cioè nel filo del punto basso del 1° giro che è rimasto dietro. Lavorare  1 p. basso, creare un petalo, cioè: 9 catenelle, 1 punto basso nella 3° catenella, continuare a punto basso,lavorare un punto basso sempre nella catenella dietro.
Continuare il giro lavorando 14 petali e chiudere il giro con 1 maglia bassissima.
4°giro:dietro i petali, puntare l’uncinetto nel filo orizzontale dietro la maglia del 1° giro,eseguire una maglia bassa ed eseguire un petalo. Il petalo sarà composto da 10 catenelle, un punto basso nella terza catenella, proseguire a punto basso, chiudere il petalo lavorano una maglia bassa nel punto di partenza del petalo.
Lavorare 14 petali, chiudere il lavoro con una maglia bassissima, sfilare il filo e tagliare.
fiore azzurro all'uncinetto
Dato che dopo la prova e lo schema, il centro mi sembrava un po’ largo, ho aggiunto un giro di catenelle con il filo rosso.

 http://islaura.it/fiori-colorati-alluncinetto/

giovedì 7 agosto 2014


Knotless chain (or regular chain) 4:


Find the back ridge of the first chain you made; you will be making your next stitches into it.

Treble crochet 2 together in the space under that back ridge.
(To treble crochet 2 together, yarn over 2 times;
insert hook under back ridge, yarn over and pull up a loop,
yarn over and pull through 2 loops,
yarn over and pull through 2 loops;
with 2 loops still on hook, yarn over 2 times,
insert hook under same back ridge, yarn over and pull up a loop,
yarn over and pull through 2 loops,
yarn over and pull through 2 loops;
yarn over and pull through all 3 loops on hook.)

You've made the first wing of your Flutter-By:


Chain 4, and find the back ridge of the 4th chain from the hook (this back ridge will form the center of the Flutter-By; all the rest of the wings will be stitched into this space):


Double crochet 1 in that back ridge:


Chain 3, and slip stitch in the same back ridge space (lower left wing now complete):


Chain 3,
double crochet in the same back ridge space,
chain 3,
slip stitch in the same back ridge space.
Your lower right wing is now complete:


Chain 3, and treble crochet 2 together in the same back ridge space. Your upper right wing is now complete:


Double treble crochet in the starting back ridge space at the top of the upper left wing (see arrow in photo above).
To double treble crochet:
yarn over 3 times,
insert hook in starting back ridge space,
yarn over and pull up a loop,
yarn over and draw through 2 loops (4 times).

Your first Flutter-By is done!


Repeat all the above steps to make another Flutter-By...


...and another...


...until your tie is as long as you'd like. (My orange curtain ties are 12 Flutter-Bys long - about 18" after end loops are added).

When you reach the desired length, it's time to loop around and start working back the other way. Do not turn your work over; keep the same side facing you at all times.

Forward Loop Chain 8 (see "Special Stitches" above for links to Forward Loop Chain tutorials; you may substitute regular chains if you like, but they'll be thinner and less sturdy):


The arrows in the photo above show where your next stitches will go.

Double crochet 2 in the back ridge of the first Forward Loop Chain:


Now stop for a moment and look at the Double Treble that connects the top wings of the Flutter-By. In the center of it you will see 2 ridges (marked by arrows in the above photo.) Your next stitches will go there.

Forward Loop Chain 1, then double crochet in each of those 2 back ridges:


Forward Loop Chain 1, then double crochet 2 in the top space of the left upper wing:


Repeat this stitch pattern across the top of your curtain tie:
(Forward Loop Chain 1,
double crochet 1 in each of the 2 center back ridges of the next double treble crochet,
Forward Loop Chain 1,
double crochet 2 in the top of the next upper left wing.)

When you reach the other end...


Forward Loop Chain 8, and connect with an Invisible Join to the first stitch of the first wing (see Special Stitches above for Invisible Join tutorial link; you may substitute a plain slip stitch join if you like.)


lunedì 4 agosto 2014


Granny Bunting Triangles

IMG_3368

IMG_3475
: TO BEGIN :: Chain 4, join with a slip stitch to form a ring.
:: ROUND 1 (Work out of central ring) ::
Chain 6 (counts as 1 tr + ch-3 corner space)
Work 3 tr into the ring, chain-3 (as above)
IMG_3476
Work 3 tr into the ring, chain-3 (as above)
IMG_3477
Work 2 tr into the ring. Now slip stitch into 3rd chain of initial ch-6 to close the round (I've put my needle in to show you where to go, above). Fasten off.
IMG_3479
You should now be looking at a weeny triangle! It has 3 lots of tr clusters, with ch-3 spaces between.
IMG_3480
:: ROUND 2 :: (Work out of chain spaces from made in previous round) Pull a loop of new colour through the first corner chain space from previous round. Now I am practiced at doing this without tying a knot, I simply hold the tail end firmly with my left hand so it doesn't slip, and hook a loop through. If you find it easier, you can knot the two tail ends together, keeping the knot as close to the work as possible.
IMG_3481
Chain 6 (counts as 1 tr + ch-3 corner space).
Now if you can manage, hold your tail ends horizontally out to the left and make sure your hook passes under them when you make the next 3 stitches. This will trap them and keep them secure until you darn them in at the end.
In 1st corner space  3 tr, ch-1 (this forms part of the 1st corner cluster)
IMG_3482
In 2nd corner space 3tr, ch-3, 3 tr, ch-1 (this is the 2nd corner cluster)
IMG_3483
In 3rd corner space 3tr, ch-3, 3 tr, ch-1 (this is the 3rd corner cluster)
IMG_3485
In 1st corner space 2 tr , join with sl st to 3rd chain of initial ch-6 (this completes  the 1st corner cluster).
IMG_3486
Yay! Round two complete! Now before you go any further, please deal with those tail ends....
IMG_3487
Turn the triangle over to the wrong side, and you should see where you have crocheted over them with those first few stitches. Now thread both ends onto a darning needle and carefully darn them back on themselves, weaving under the yarn of that corner cluster. Don't pull too tight.
IMG_3489
:: ROUND 3 :: (Work out of chain spaces) Pull a loop of new colour through the first corner chain space from previous round.
Chain 6 (counts as 1 tr + ch-3 corner space)
Remember to crochet over your tail ends as you work this first bit.........
In 1st corner space  3 tr, ch-1(this forms part of the 1st corner cluster).
IMG_3490
In next chain space 3tr, ch-1 (this is a side cluster)
IMG_3491
In next corner space 3tr, ch-3, 3 tr , ch-1 (this is the 2nd corner cluster)
IMG_3493
In next chain space 3tr, ch-1 (this is a side cluster)
In next corner space 3tr, ch-3, 3 tr , ch-1 (this is the 3rd corner cluster)
In next chain space 3tr, ch-1 (this is a side cluster)
In 1st corner space 2 tr , join with sl st to 3rd chain of initial ch-6. (this completes the 1st corner cluster).
Fasten off and darn in ends.
I'm hoping by now that you are beginning to get an idea of how this simple pattern forms. The way each round begins and ends in the same corner space, the way the side clusters are separated by chain-1 spaces, and the way the corner clusters are separated by chain-3 spaces. It's pretty straightforward eh? Onto the next round then......
IMG_3495
:: ROUND 4 :: (Work out of chain spaces) Pull a loop of new colour through the first corner chain space from previous round.
Chain 6 (counts as 1 tr + ch-3 corner space)
Remember to crochet over your tail ends as you work this first bit.........
In 1st corner space  3 tr, ch-1(this forms part of the 1st corner cluster)
In next chain space 3tr, ch-1 (this is a side cluster)
IMG_3497
In next corner space 3tr, ch-3, 3 tr, ch-1 (this is the 2nd corner cluster)
In next chain space 3tr, ch-1 (this is a side cluster)
IMG_3498
In next corner space 3tr, ch-3, 3 tr, ch-1 (this is the 3rd corner cluster)
In next chain space 3tr, ch-1 (this is a side cluster)
In 1st corner space 2 tr , join with sl st to 3rd chain of initial ch-6. (this completes the 1st corner cluster).
Fasten off and darn in ends.
IMG_3501
:: ROUND 5, 6 and 7 ::
Work as for round 4, adding in extra side clusters with each round. Remember you are working chain-3 spaces in between the corner clusters and chain-1 spaces between the side clusters.
It helps if you darn in your ends as you go, at the end of each round.
Now then....you have finished crocheting, but you may well find that your granny triangle is looking a little bit worse for wear. Does it have wibbly wobbly edges and untidy curling corners? Well Granny is ready for her Spa treatment!
IMG_3507
I've used 100% acrylic yarn here, but this method of steam blocking works with any fibre. You need an ironing board, a steam iron and 3 pins.
Turn the triangle over so that the right side faces downwards. Stretch out the top edge and put a pin in each corner. You are pinning directly into your ironing board cover, putting the pins at an angle so's they don't ping out.
Pull the bottom corner downwards until the triangle edges look straight and even, and put a pin in the bottom corner.
Now set your iron to the LOWEST heat setting, and make sure you have STEAM. IMG_3509
Now HoVeR!!!! This is VErY ImPorTaNt....The Iron Does Not Touch The Crochet. You hover it very, very close, about a centimetre above the surface of the yarn, and you simply allow the steam to do the work. No contact, no pressure. Just the pfffffffffffffffff of the steam. Concentrate on the corners. It does not take long, maybe ten seconds is all. And the results are absolutely miraculous.
IMG_3512

from http://attic24.typepad.com/weblog/granny-bunting-triangles.html